Configuring Networking
With this Terraform code, you will create a number of items related to networking. This will include a virtual router, security zones, networking interfaces, and static routes.
Assumptions
This tutorial/guide assumes:
- you have a working installation of Terraform (see example instructions here)
- you have working connectivity to the firewall and/or Panorama
- you have administrative credentials capable of performing the relevant operations on the firewall and/or Panorama
Important - Work in a Lab Environment First
With all of the tutorials and guides presented on this website, please ensure that you attempt the tasks in a lab or a similar safe and non-production environment first. In public cloud scenarios, this should be a non-production cloud account which contains no production assets or data. Confirm the tasks behave as expected and perform the operations you require, before using them in production or other live environments.
Get Terraform ready for configuration
In the first section, you will create a Terraform file, and initialize Terraform so it is ready to perform configuration operations.
- Create a file called
networking.tfand paste in the following content:
terraform {
    required_providers {
        panos = {
            source  = "paloaltonetworks/panos"
            version = "~> 1.11.0"
        }
    }
}

provider "panos" {
    hostname = var.panos_hostname
    username = var.panos_username
    password = var.panos_password
}

variable "panos_hostname" {
  type = string
  default = "192.168.1.1"
}

variable "panos_username" {
  type = string
  default = "admin"
}

variable "panos_password" {
  type = string
  default = "admin"
}
- Edit the
variablesections of the file, replacing the values forpanos_hostname,panos_usernameandpanos_passwordwith relevant values for your environment. For example:
.
.

variable "panos_hostname" {
  type = string
  default = "172.16.14.5"
}

variable "panos_username" {
  type = string
  default = "firewall_admin"
}

variable "panos_password" {
  type = string
  default = "a_pa55word_l1ke_th1s"
}
.
.
The PAN-OS credentials are being stored within the code and on disk unencrypted. This is not a production-level solution, and other solutions for managing secrets should be considered for real-world deployments. Hashicorp (owners of Terraform) and many others have solutions for this.
- Initialize Terraform with the following command, which will download the PAN-OS provider:
terraform init
- The output should look something like this:
Initializing the backend...

Initializing provider plugins...
- Finding paloaltonetworks/panos versions matching "~> 1.11.0"...
- Installing paloaltonetworks/panos v1.11.0...
- Installed paloaltonetworks/panos v1.11.0 (signed by a HashiCorp partner, key ID D5D93F98EFA33E83)

Partner and community providers are signed by their developers.
If you'd like to know more about provider signing, you can read about it here:
https://www.terraform.io/docs/plugins/signing.html

Terraform has created a lock file .terraform.lock.hcl to record the provider
selections it made above. Include this file in your version control repository
so that Terraform can guarantee to make the same selections by default when
you run "terraform init" in the future.

Terraform has been successfully initialized!

You may now begin working with Terraform. Try running "terraform plan" to see
any changes that are required for your infrastructure. All Terraform commands
should now work.

If you ever set or change modules or backend configuration for Terraform,
rerun this command to reinitialize your working directory. If you forget, other
commands will detect it and remind you to do so if necessary.
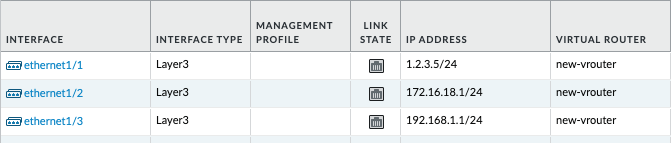
Configure Network Interfaces
This Terraform code will configure three network interfaces, which you will later attach to security zones and a virtual router.
- Add the following code to the bottom of the existing
networking.tffile:
resource "panos_ethernet_interface" "e1" {
  vsys        = "vsys1"
  name        = "ethernet1/1"
  mode        = "layer3"
  static_ips  = ["1.2.3.5/24"]
  enable_dhcp = false

  lifecycle {
    create_before_destroy = true
  }
}

resource "panos_ethernet_interface" "e2" {
  vsys        = "vsys1"
  name        = "ethernet1/2"
  mode        = "layer3"
  static_ips  = ["172.16.18.1/24"]
  enable_dhcp = false

  lifecycle {
    create_before_destroy = true
  }
}

resource "panos_ethernet_interface" "e3" {
  vsys        = "vsys1"
  name        = "ethernet1/3"
  mode        = "layer3"
  static_ips  = ["192.168.1.1/24"]
  enable_dhcp = false

  lifecycle {
    create_before_destroy = true
  }
}
- Instruct Terraform to inspect the firewall, and calculate the changes it will need to make in future, based on the Terraform code:
terraform plan
- The output should look something like this:
Terraform used the selected providers to generate the following execution plan. Resource actions are indicated with the following symbols:
  + create

Terraform will perform the following actions:

  # panos_ethernet_interface.e1 will be created
  + resource "panos_ethernet_interface" "e1" {
      + enable_dhcp = false
      + id          = (known after apply)
      + mode        = "layer3"
      + name        = "ethernet1/1"
      + static_ips  = [
          + "1.2.3.5/24",
        ]
      + vsys        = "vsys1"
    }

  # panos_ethernet_interface.e2 will be created
  + resource "panos_ethernet_interface" "e2" {
      + enable_dhcp = false
      + id          = (known after apply)
      + mode        = "layer3"
      + name        = "ethernet1/2"
      + static_ips  = [
          + "172.16.18.1/24",
        ]
      + vsys        = "vsys1"
    }

  # panos_ethernet_interface.e3 will be created
  + resource "panos_ethernet_interface" "e3" {
      + enable_dhcp = false
      + id          = (known after apply)
      + mode        = "layer3"
      + name        = "ethernet1/3"
      + static_ips  = [
          + "192.168.1.1/24",
        ]
      + vsys        = "vsys1"
    }

Plan: 3 to add, 0 to change, 0 to destroy.
- Instruct Terraform to inspect the firewall, calculate the changes it will need to make (based on the Terraform code), and execute the changes:
terraform apply
- When prompted, say
yesto confirm you are happy to make these changes
Do you want to perform these actions?
  Terraform will perform the actions described above.
  Only 'yes' will be accepted to approve.

  Enter a value:
- The output should look something like this:
panos_ethernet_interface.e3: Creating...
panos_ethernet_interface.e2: Creating...
panos_ethernet_interface.e1: Creating...
panos_ethernet_interface.e2: Creation complete after 3s [id=vsys1:ethernet1/2]
panos_ethernet_interface.e3: Creation complete after 3s [id=vsys1:ethernet1/3]
panos_ethernet_interface.e1: Creation complete after 3s [id=vsys1:ethernet1/1]

Apply complete! Resources: 3 added, 0 changed, 0 destroyed.
- Login to the PAN-OS GUI and confirm that the three network interfaces have been configured.
Create a Virtual Router
This Terraform code will configure a virtual router, to which we will attach the three network interfaces you created in the previous step.
- Add the following code to the bottom of the existing
networking.tffile:
resource "panos_virtual_router" "vr1" {
  name = "new-vrouter"
  interfaces = [
    panos_ethernet_interface.e1.name,
    panos_ethernet_interface.e2.name,
    panos_ethernet_interface.e3.name,
  ]

  lifecycle {
    create_before_destroy = true
  }
}
- Instruct Terraform to inspect the firewall, and calculate the changes it will need to make in future, based on the Terraform code:
terraform plan
- The output should look something like this (note the default values passed in by the PAN-OS provider for various routing protocols):
Terraform used the selected providers to generate the following execution plan. Resource actions are indicated with the following symbols:
  + create

Terraform will perform the following actions:

  # panos_virtual_router.vr1 will be created
  + resource "panos_virtual_router" "vr1" {
      + ebgp_dist        = 20
      + ibgp_dist        = 200
      + id               = (known after apply)
      + interfaces       = [
          + "ethernet1/1",
          + "ethernet1/2",
          + "ethernet1/3",
        ]
      + name             = "new-vrouter"
      + ospf_ext_dist    = 110
      + ospf_int_dist    = 30
      + ospfv3_ext_dist  = 110
      + ospfv3_int_dist  = 30
      + rip_dist         = 120
      + static_dist      = 10
      + static_ipv6_dist = 10
    }

Plan: 1 to add, 0 to change, 0 to destroy.
- Instruct Terraform to inspect the firewall, calculate the changes it will need to make (based on the Terraform code), and execute the changes:
terraform apply
- When prompted, say
yesto confirm you are happy to make these changes
Do you want to perform these actions?
  Terraform will perform the actions described above.
  Only 'yes' will be accepted to approve.

  Enter a value:
- The output should look something like this:
panos_virtual_router.vr1: Creating...
panos_virtual_router.vr1: Creation complete after 1s [id=:::new-vrouter]

Apply complete! Resources: 1 added, 0 changed, 0 destroyed.
- Login to the PAN-OS GUI and confirm that the virtual router has been created, with three imported network interfaces.

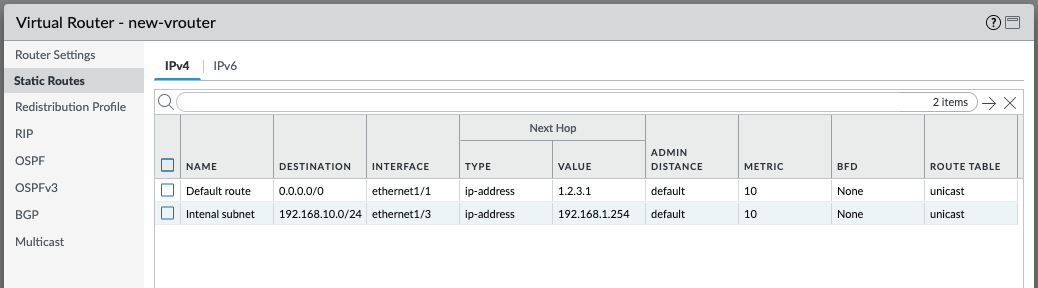
Create Static Routes
This Terraform code will configure static routes within the virtual router you just created. You will add a default route to the Internet, and an internal route too.
- Add the following code to the bottom of the existing
networking.tffile:
resource "panos_static_route_ipv4" "defaultroute" {
  name           = "defaultroute"
  virtual_router = panos_virtual_router.vr1.name
  destination    = "0.0.0.0/0"
  interface      = "ethernet1/1"
  next_hop       = "1.2.3.1"

  lifecycle {
    create_before_destroy = true
  }
}

resource "panos_static_route_ipv4" "internalroute" {
  name           = "Internal subnet"
  virtual_router = panos_virtual_router.vr1.name
  destination    = "192.168.10.0/24"
  interface      = "ethernet1/3"
  next_hop       = "192.168.1.254"

  lifecycle {
    create_before_destroy = true
  }
}
- Instruct Terraform to inspect the firewall, and calculate the changes it will need to make in future, based on the Terraform code:
terraform plan
- The output should look something like this:
Terraform used the selected providers to generate the following execution plan. Resource actions are indicated with the following symbols:
  + create

Terraform will perform the following actions:

  # panos_static_route_ipv4.defaultroute will be created
  + resource "panos_static_route_ipv4" "defaultroute" {
      + destination    = "0.0.0.0/0"
      + id             = (known after apply)
      + interface      = "ethernet1/1"
      + metric         = 10
      + name           = "defaultroute"
      + next_hop       = "1.2.3.1"
      + route_table    = "unicast"
      + type           = "ip-address"
      + virtual_router = "new-vrouter"
    }

  # panos_static_route_ipv4.internalroute will be created
  + resource "panos_static_route_ipv4" "internalroute" {
      + destination    = "192.168.10.0/24"
      + id             = (known after apply)
      + interface      = "ethernet1/3"
      + metric         = 10
      + name           = "Internal subnet"
      + next_hop       = "192.168.1.254"
      + route_table    = "unicast"
      + type           = "ip-address"
      + virtual_router = "new-vrouter"
    }

Plan: 2 to add, 0 to change, 0 to destroy.
- Instruct Terraform to inspect the firewall, calculate the changes it will need to make (based on the Terraform code), and execute the changes:
terraform apply
- When prompted, say
yesto confirm you are happy to make these changes
Do you want to perform these actions?
  Terraform will perform the actions described above.
  Only 'yes' will be accepted to approve.

  Enter a value:
- The output should look something like this:
panos_static_route_ipv4.internalroute: Creating...
panos_static_route_ipv4.defaultroute: Creating...
panos_static_route_ipv4.internalroute: Creation complete after 1s [id=new-vrouter:Internal subnet]
panos_static_route_ipv4.defaultroute: Creation complete after 1s [id=new-vrouter:defaultroute]

Apply complete! Resources: 2 added, 0 changed, 0 destroyed.
- Login to the PAN-OS GUI and confirm that the two new static routes have been created inside the virtual router.
Create and assign security zones
This Terraform code will create three security zones, and assign them to the three network interfaces previously created.
- Add the following code to the bottom of the existing
networking.tffile:
resource "panos_zone" "internet" {
  name = "internet"
  mode = "layer3"
  interfaces = [
    panos_ethernet_interface.e1.name,
  ]
  enable_user_id = false

  lifecycle {
    create_before_destroy = true
  }
}

resource "panos_zone" "dmz" {
  name = "dmz"
  mode = "layer3"
  interfaces = [
    panos_ethernet_interface.e2.name,
  ]
  enable_user_id = true

  lifecycle {
    create_before_destroy = true
  }
}

resource "panos_zone" "users" {
  name = "users"
  mode = "layer3"
  interfaces = [
    panos_ethernet_interface.e3.name,
  ]
  enable_user_id = true

  lifecycle {
    create_before_destroy = true
  }
}
- Instruct Terraform to inspect the firewall, and calculate the changes it will need to make in future, based on the Terraform code:
terraform plan
- The output should look something like this:
Terraform used the selected providers to generate the following execution plan. Resource actions are indicated with the following symbols:
  + create

Terraform will perform the following actions:

  # panos_zone.dmz will be created
  + resource "panos_zone" "dmz" {
      + enable_user_id = true
      + id             = (known after apply)
      + interfaces     = [
          + "ethernet1/2",
        ]
      + mode           = "layer3"
      + name           = "dmz"
      + vsys           = "vsys1"
    }

  # panos_zone.internet will be created
  + resource "panos_zone" "internet" {
      + enable_user_id = false
      + id             = (known after apply)
      + interfaces     = [
          + "ethernet1/1",
        ]
      + mode           = "layer3"
      + name           = "internet"
      + vsys           = "vsys1"
    }

  # panos_zone.users will be created
  + resource "panos_zone" "users" {
      + enable_user_id = true
      + id             = (known after apply)
      + interfaces     = [
          + "ethernet1/3",
        ]
      + mode           = "layer3"
      + name           = "users"
      + vsys           = "vsys1"
    }

Plan: 3 to add, 0 to change, 0 to destroy.
- Instruct Terraform to inspect the firewall, calculate the changes it will need to make (based on the Terraform code), and execute the changes:
terraform apply
- When prompted, say
yesto confirm you are happy to make these changes
Do you want to perform these actions?
  Terraform will perform the actions described above.
  Only 'yes' will be accepted to approve.

  Enter a value:
- The output should look something like this:
panos_zone.users: Creating...
panos_zone.internet: Creating...
panos_zone.dmz: Creating...
panos_zone.dmz: Creation complete after 1s [id=::vsys1:dmz]
panos_zone.internet: Creation complete after 1s [id=::vsys1:internet]
panos_zone.users: Creation complete after 1s [id=::vsys1:users]

Apply complete! Resources: 3 added, 0 changed, 0 destroyed.
- Login to the PAN-OS GUI and confirm that the three new zones have been have been created, and they have been assigned to network interfaces.


Committing Configuration Changes
Please note that, due to how Terraform operates, in-band commits for PAN-OS are currently not possible. Therefore the changes you made with the steps above will be present only in the candidate configuration. A commit can performed out of band, either manually or through the approach discussed here.
Final code
Putting all the sections together, the code in entirety looks like this:
# Define required Terraform providers
terraform {
  required_providers {
    panos = {
      source  = "paloaltonetworks/panos"
      version = "~> 1.11.0"
    }
  }
}

# Configure the PAN-OS provider for Terraform
provider "panos" {
  hostname = var.panos_hostname
  username = var.panos_username
  password = var.panos_password
}

variable "panos_hostname" {
  type    = string
  default = "vm-series-test.jamoi.xyz"
}

variable "panos_username" {
  type    = string
  default = "admin"
}

variable "panos_password" {
  type    = string
  default = "Commit123!"
}

# Configure interfaces
resource "panos_ethernet_interface" "e1" {
  vsys        = "vsys1"
  name        = "ethernet1/1"
  mode        = "layer3"
  static_ips  = ["1.2.3.5/24"]
  enable_dhcp = false

  lifecycle {
    create_before_destroy = true
  }
}

resource "panos_ethernet_interface" "e2" {
  vsys        = "vsys1"
  name        = "ethernet1/2"
  mode        = "layer3"
  static_ips  = ["172.16.18.1/24"]
  enable_dhcp = false

  lifecycle {
    create_before_destroy = true
  }
}

resource "panos_ethernet_interface" "e3" {
  vsys        = "vsys1"
  name        = "ethernet1/3"
  mode        = "layer3"
  static_ips  = ["192.168.1.1/24"]
  enable_dhcp = false

  lifecycle {
    create_before_destroy = true
  }
}

# Create a virtual router
resource "panos_virtual_router" "vr1" {
  name = "new-vrouter"
  interfaces = [
    panos_ethernet_interface.e1.name,
    panos_ethernet_interface.e2.name,
    panos_ethernet_interface.e3.name,
  ]

  lifecycle {
    create_before_destroy = true
  }
}

# Create routes

resource "panos_static_route_ipv4" "defaultroute" {
  name           = "defaultroute"
  virtual_router = panos_virtual_router.vr1.name
  destination    = "0.0.0.0/0"
  interface      = "ethernet1/1"
  next_hop       = "1.2.3.1"

  lifecycle {
    create_before_destroy = true
  }
}

resource "panos_static_route_ipv4" "internalroute" {
  name           = "Internal subnet"
  virtual_router = panos_virtual_router.vr1.name
  destination    = "192.168.10.0/24"
  interface      = "ethernet1/3"
  next_hop       = "192.168.1.254"

  lifecycle {
    create_before_destroy = true
  }
}

# Configure security zones
resource "panos_zone" "internet" {
  name = "internet"
  mode = "layer3"
  interfaces = [
    panos_ethernet_interface.e1.name,
  ]
  enable_user_id = false

  lifecycle {
    create_before_destroy = true
  }
}

resource "panos_zone" "dmz" {
  name = "dmz"
  mode = "layer3"
  interfaces = [
    panos_ethernet_interface.e2.name,
  ]
  enable_user_id = true

  lifecycle {
    create_before_destroy = true
  }
}

resource "panos_zone" "users" {
  name = "users"
  mode = "layer3"
  interfaces = [
    panos_ethernet_interface.e3.name,
  ]
  enable_user_id = true

  lifecycle {
    create_before_destroy = true
  }
}
Closing notes
- Note that when working with Terraform at scale and in production, the code would likely be split into several
.tffiles for the provider section, the variable section, and the rest of the code. For the purposes of this learning tutorial, keeping the code in a single file works fine. - The PAN-OS credentials are being stored within the code and on disk unencrypted. This is not a production-level solution, and other solutions for managing secrets should be considered for real-world deployments. Hashicorp (owners of Terraform) and many others have solutions for this.
- Almost all values were defined within the code; names of configuration items, IP addresses, and more. This is very suitable for a learning tutorial, but this approach does not scale well in production, and using variables instead is something to consider as you operationalize Terraform within your organization.