Automating IP Blocking
In this Quickstart guide we'll show how to integrate with Palo Alto Networks Next-Generation Firewalls to automatically block communications (incoming, outgoing or both) from/to specific IP addresses. This is a common pattern used in partner and customer integrations to automate remediation based on external factors, such as alerts or Threat Intel data.
Common use cases
- Isolate a client and prevent it from accessing the Internet (including Command & Control servers) and sensitive internal resources (block outgoing communications)
- Block a remote malicious IP - e.g., a known C2 server (block outgoing communications)
- Block an external IP address that is attacking the corporate network (block incoming communications)
- Allow connections to a specific external IP address - e.g., a known SaaS service (whitelist outgoing communications)
This guide leverages the concept of dynamic tags. In PAN-OS it is possible to dynamically associate (and remove) tags from IP addresses, using several ways, including the XML API. A tag is simply a string that can be used as a match criteria in Dynamic Address Groups, allowing the Firewall to dynamically allow/block traffic without requiring a configuration commit.
While the exact same approach can be applied for whitelisting (as in the last examples above), for simplicity, in this article, we'll just refer to blocking, which is the most common use case, but the same techniques apply for both.
This article refers to blocking based on IP address, which is very common in automation, and refers to the Dynamic Address Group (DAG) feature of PAN-OS. If you need to block URLs or domains, other options are available that are not covered by this guide.
Requirements
To follow this guide, it is recommended that that you are familiar with the concepts of Palo Alto Networks Next-Generation Firewalls, Security Policies and APIs. Some basic understanding of XML is also recommended.
Make sure you have a Palo Alto Networks Next-Generation Firewall deployed and that you have administrative access to its Management interface via HTTPS. To avoid potential disruptions, it's recommended to run all the tests on a non-production environment.
No specific programming language expertise is required, although Python is recommended. Examples with both curl and pan-python are provided.
Steps
To block traffic to/from specific IP addresses, you will go through the following steps described in this guide:
- Configure a Dynamic Address Group (DAG) that will use a specific tag for membership.
- Create a Security Policy that uses that DAG as the source or destination (depending on the use case)
- Commit the Firewall configuration to make sure that the changes are applied
- Obtain the Next-Generation Firewall's API Key to programmatically interact with the API
- Use the PAN-OS XML API to associate IP addresses to the tag you previously created
- Verify that the configuration is working
- Use API to deassociate the IP Addresses from the tag (cleanup)
More information about DAGs are available here.
The scope of this tutorial is to demonstrate how to programmatically tag/untag IPs that can be used in policies. The policies will be created manually via the Web UI. Automating the creation of Security Policies is possible with PAN-OS, although more considerations have to be taken into account (Zones, ordering of rules, etc.), and it is not covered in this guide.
Step 1: Create a Dynamic Address Group
To create a DAG, follow these steps:
-
Login on the Next-Generation Firewall with administrative credentials:
-
Navigate to Objects - Address Groups, then click on Add:

-
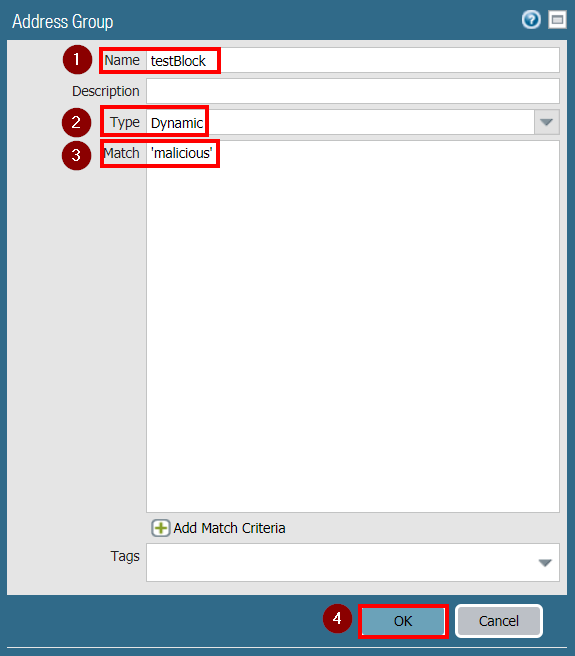
Enter the Name (testBlock in the example), select Dynamic as Type. In the Match window type 'malicious'. Note the single quotes. This is the name of the tag you are going to use for matching. Every IP that is tagged with the malicious tag will be automatically added in this Dynamic Address Group. Note that you can use the and and or keywords if you want the DAG to match multiple tags. Then click on OK:
Step 2: Create a Security Policy
As previously mentioned, the way you create a Security Policy will determine how the firewall will behave. The policy created in this example will block all outgoing connections to malicious IPs (e.g., C2 servers). In this case, the configuration of the policy will be as follows:
- Source: Trust Zone, Any IP (e.g., Corporate network)
- Destination: Untrust Zone, testBlock Dynamic Address Group (the IPs you will tag as malicious)
- Application: Any
- Service: Any
- Actions: Block
To change the use case, for example to block infected clients from reaching the Internet, you can just use the testBlock DAG in the source instead of the destination. To block malicious external IPs from reaching your network from outside, you can just flip the Source and the Destination zones. Add so on.
To Create a Security Policy, follow these steps:
-
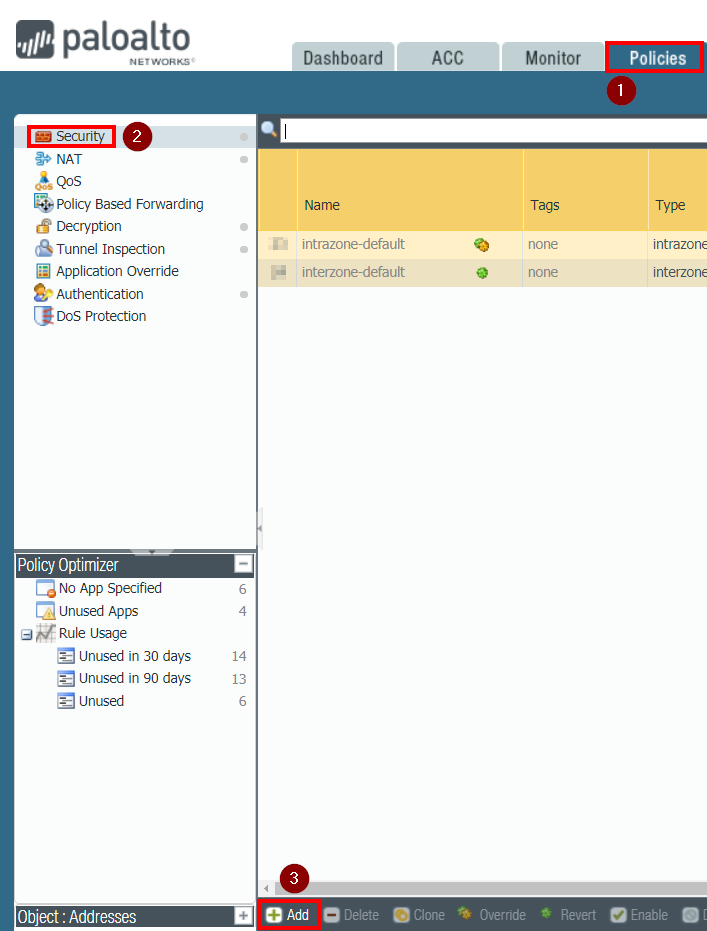
Navigate to Policies - Security, then click on Add:
-
Enter the parameters as follows:
-
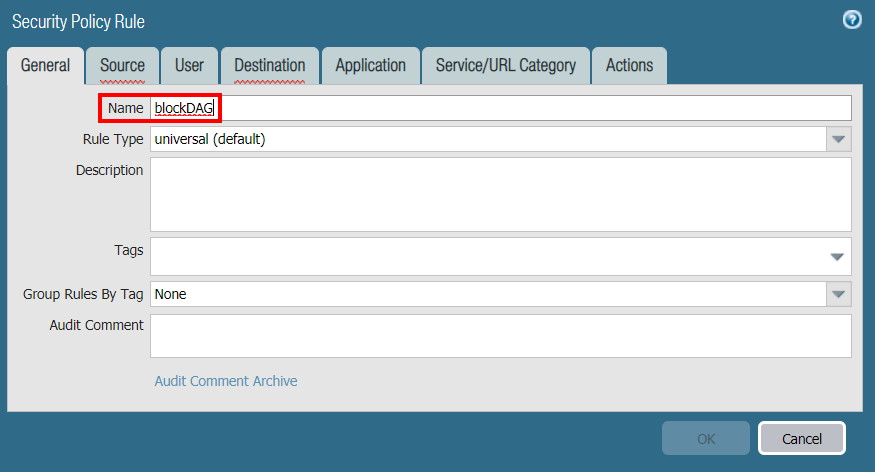
In the General tab, enter the policy Name (blockDAG in the example):
-
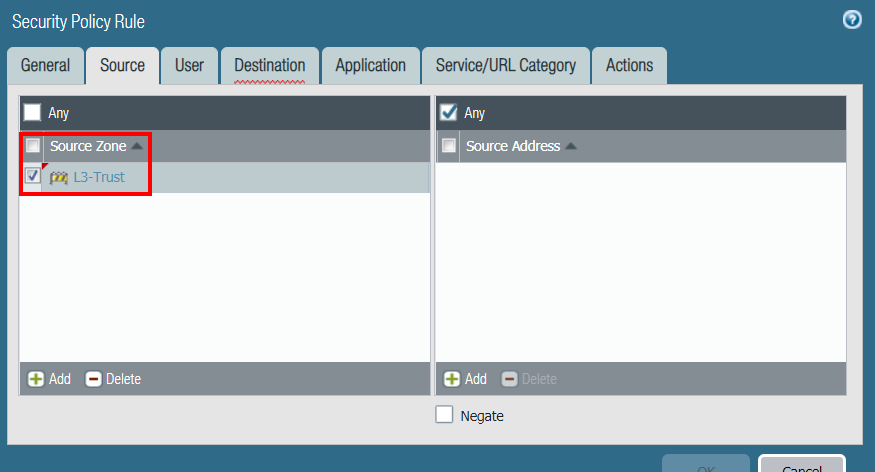
In the Source tab, Add the trusted zone (L3-Trust in the example), leave the Source Address at Any:
-
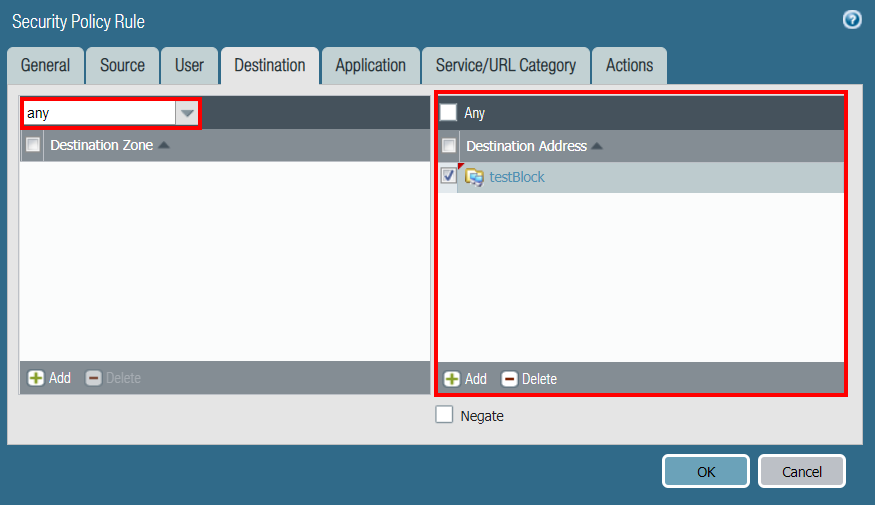
In the Destination tab, Add the untrusted zone (L3-Untrust in the example), and Add the testBlock DAG as the Destination Address:
-
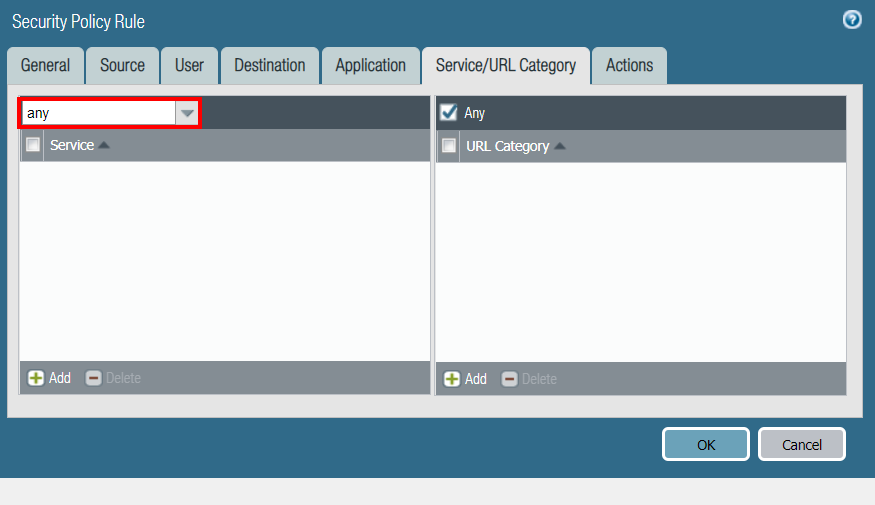
In the Service/URL Category tab, select any as the Service:
-
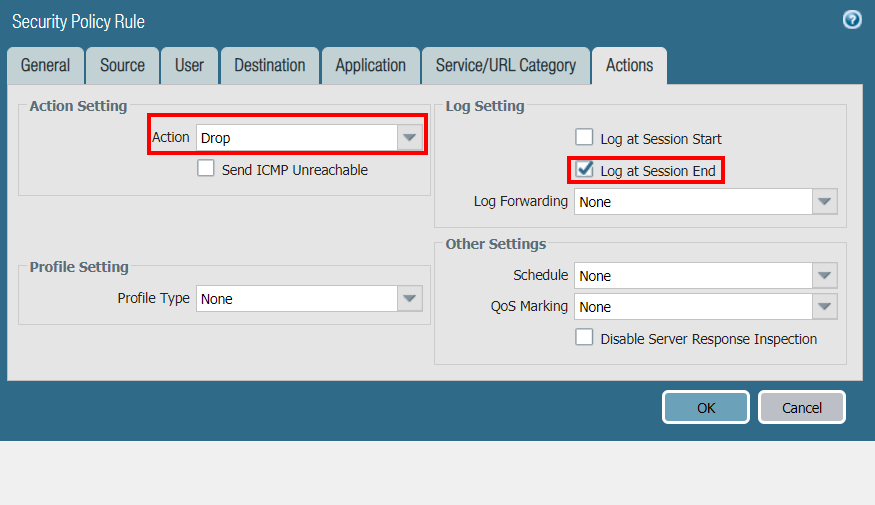
In the Actions tab, select Drop as the Action, and enable the Log at Session End checkbox:
-
Click OK and check the newly created policy:
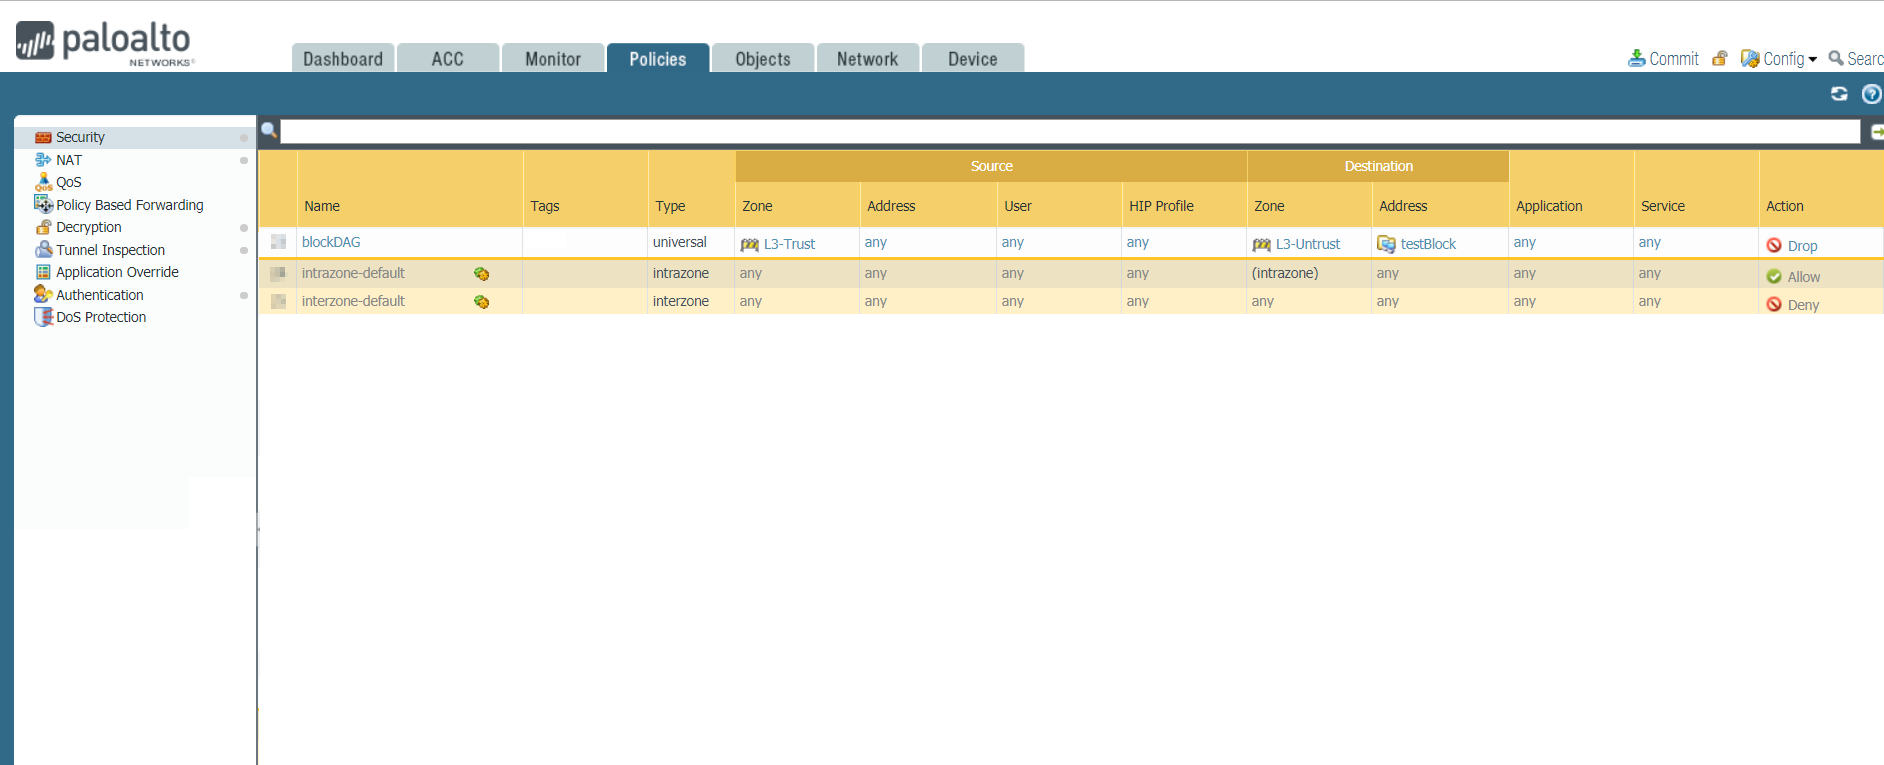
The ordering of the policy is very important. In this example you must create the block/drop policy on the top of the ruleset. If the policy is shadowed by other rules that allow traffic, it won't be matched and the communications will still be allowed.
The name of the Zones can be different in your setup, as well as the network topology. Multiple zones can be present.
Step 3: Commit the configuration
Now that the DAG and the policy have been created, you can Commit the configuration:
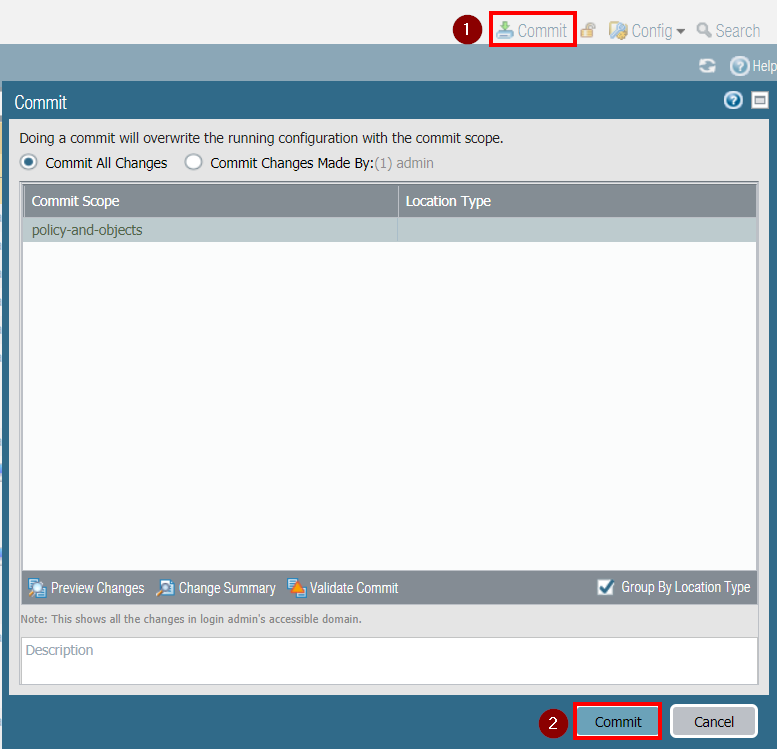
The Firewall configuration has been completed! No further commits are required by the IP registration process.
Step 4: Obtain the Firewall API Key
It is now time to start interacting with the PAN-OS APIs. If you're able to connect to the Firewall management interface as admin, you should also be able to issue commands via the API. If you run into issues, please check if API access is enabled for your role. After that, you can generate an API key using the XML API or pan-python.
The API authentication is based on an API Key which is derived from your credentials (username, password and a firewall master key). The API Key doesn't change unless the credentials change, so you can reuse it for subsequent calls. Make sure you store it securely and don't leave it behind in the source code of your scripts.
More information on the API Key is available here.
For more information about the PAN-OS XML API, please refer to the official documentation.
Step 5: Tag IP addresses
To tag IP Addresses using the XML API, you must invoke the Firewall API endpoint with the following parameters:
- HTTP Method:
POST - URL:
/api - URL Parameters:
- type:
user-id - key:
your API Key
- type:
- POST Parameters:
- cmd:
XML document with registration information
- cmd:
- Headers:
- Content-Type:
application/x-www-form-urlencoded
- Content-Type:
You will need to craft an XML document similar to the following:
<uid-message>
  <type>update</type>
  <payload>
    <register>
      <entry ip="10.0.0.1" persistent="1">
        <tag>
          <member timeout="0">malicious</member>
        </tag>
      </entry>
      <entry ip="10.0.0.2" persistent="0">
        <tag>
          <member timeout="3600">malicious</member>
        </tag>
      </entry>
    </register>
  </payload>
</uid-message>
The following rules apply:
- For each IP address you want to register, you can specify multiple tags.
- Only single IP Addresses are supported (no CIDRs/Ranges)
- For each IP address, you can specify the optional persistent parameter. The default is 1, which means that the tagging will survive reboots of the Firewall.
- Starting from PAN-OS 9.0, for each tag, you can specify the optional timeout parameter, to specify the expiration in seconds of the tag. The default is 0, which means 'never expire'. The maximum value is 2592000 (30 days).
The document above applies the malicious tag to IP addresses 10.0.0.1 and 10.0.0.2, the first in a persistent way with no expiration, the latter in a non-persistent way with an automatic expiration time of 1 hour.
You can now push the document to the PAN-OS XML API to register the IPs.
Method 1: curl
Create a document, similar to the one above, called uid-register.xml.
Then call curl with the following parameters:
curl -k -X POST 'https://<your_firewall_url>/api/?type=user-id&key=<your_api_key>' --data-urlencode cmd@uid-register.xml
The successful response will be similar to the following:
<response status="success">
  <result>
    <uid-response>
      <version>2.0</version>
        <payload>
          <register></register>
        </payload>
    </uid-response>
  </result>
</response>
Method 2: pan-python
Create a document, similar to the one above, called uid-register.xml.
Then use panxapi.py to set the tags:
panxapi.py -U uid-register.xml -h <yout_firewall_ip> -K <your_api_key>
Example output:
dynamic-update: success
Step 6: Verify
To verify the successful tagging, you can either use the UI or the CLI. If the membership is correct, it means that the Dynamic Address Group has been populated with the IPs you tagged.
You should also test some network connections to make sure that the traffic is blocked and the dropped connections show up in the Traffic logs: if the traffic is not blocked, it might be a problem within the Security Policy configuration (i.e. another policy shadowing the one you created).
Method 1: Web UI
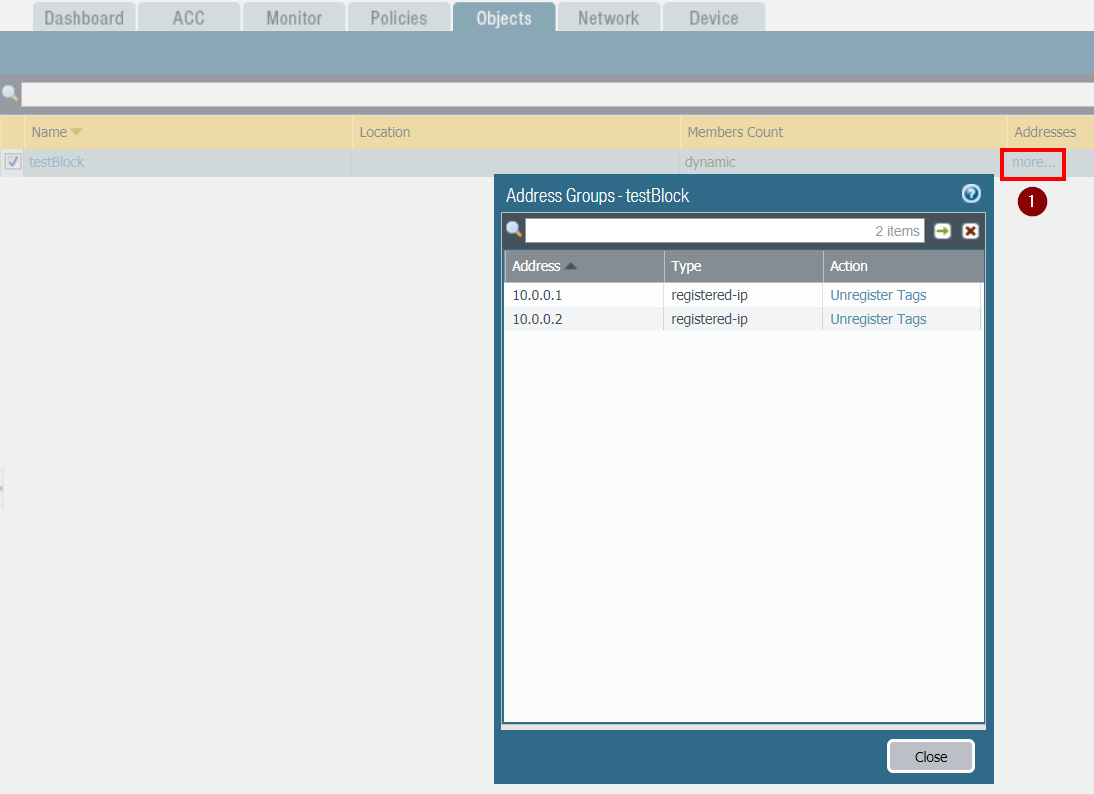
After logging on the Firewall Web UI as admin, navigate on Objects - Dynamic Groups. Locate the DAG you previously created (testBlock in the example). Under the Addresses column, click on more...
If successful, it will display the IP addresses currently associated with the DAG, as shown in the following screenshot:
Method 2: CLI
You can login on the Firewall via SSH as admin and run the following commands to check if the DAGs have been populated successfully and the IPs have been tagged:
show object dynamic-address-group allto check the DAG membershipshow object registered-ip allto check the IP tagging
Check DAG membership:
show object dynamic-address-group all
Example output:
Dynamic address groups in vsys vsys1:
----------------------------------------------------

----------------defined in vsys --------------------
        testBlock
                filter: 'malicious'

                        10.0.0.1 (R)
                        10.0.0.2 (R)
                members: total 2

----------------defined in shared-------------------
O: address object; R: registered ip; D: dynamic group; S: static group
Check ip tagging:
show object registered-ip all
Example output:
registered IP                             Tags
----------------------------------------  -----------------

10.0.0.1 #
                                         "malicious (never expire)"

10.0.0.2
                                         "malicious (expire in 2980 seconds)"

Total: 2 registered addresses
*: received from user-id agent  #: persistent
For the 10.0.0.2 note the expiration time and the non persistency.
Method 3: using the XML API
You can also issue the same CLI commands using an operational commands XML API request.
Here are some examples using curl:
Dynamic Address Groups:
curl -k -X POST 'https://<your_firewall_ip>/api/?type=op&key=<your_api_key>&cmd=<show><object><dynamic-address-group><all></all></dynamic-address-group></object></show>'
The output will be similar to the following:
<response cmd="status" status="success">
  <result>
    <dyn-addr-grp>
      <entry>
        <vsys>vsys1</vsys>
        <group-name>testBlock</group-name>
        <filter>'malicious'</filter>
        <member-list>
          <entry name="10.0.0.1" type="registered-ip"/>
          <entry name="10.0.0.2" type="registered-ip"/>
        </member-list>
      </entry>
    </dyn-addr-grp>
  </result>
  </response>
Registered IPs:
curl -k -X POST 'https://<your_firewall_ip>/api/?type=op&key=<your_api_key>&cmd=<show><object><registered-ip><all></all></registered-ip></object></show>'
The output will be similar to the following:
<response status="success">
  <result>
    <entry ip="10.0.0.1" from_agent="0" persistent="1">
      <tag>
        <member>malicious</member>
      </tag>
    </entry>
    <entry ip="10.0.0.2" from_agent="0" persistent="0">
      <tag>
        <member>malicious</member>
      </tag>
    </entry>
    <count>2</count>
  </result>
</response>
Step 7: Untag IP addresses
If you want to remove the tags from existing IP addresses, the procedure is very similar. Just create an XML document with unregister commands as part of the payload.
The following example will unregister both IP addresses registered in the previous steps:
<uid-message>
  <type>update</type>
  <payload>
    <unregister>
      <entry ip="10.0.0.1">
        <tag>
          <member>malicious</member>
        </tag>
      </entry>
      <entry ip="10.0.0.2">
        <tag>
          <member>malicious</member>
        </tag>
      </entry>
    </unregister>
  </payload>
</uid-message>
You can also mix registration and unregistration messages in the same XML document.
You can now push the document to the PAN-OS XML API in the same way as before.
Method 1: curl
Create a document, similar to the one above, called uid-unregister.xml.
Then run curl with the following parameters:
curl -k -X POST 'https://<your_firewall_url>/api/?type=user-id&key=<your_api_key>' --data-urlencode cmd@uid-unregister.xml
The successful response will be similar to the following:
<response status="success">
  <result>
    <uid-response>
      <version>2.0</version>
        <payload>
          <unregister></unregister>
        </payload>
    </uid-response>
  </result>
</response>
Method 2: pan-python
Create a document, similar to the one above, called uid-unregister.xml.
Then use panxapi.py to unset the tags:
panxapi.py -U uid-unregister.xml -h <your_firewall_ip> -K <your_api_key>
Example output:
dynamic-update: success
Conclusion
In this QuickStart we demonstrated how to perform dynamic blacklisting (or whitelisting) of IP addresses using Palo Alto Networks Next-Generation Firewalls.
Specifically, you learned how to:
- Create Dynamic Address Groups (DAGs) based on tags
- Create Security Policies that leverage DAGs to block specific traffic
- Use the PAN-OS XML API to:
- Obtain an API Key to programmatically access the Firewalls
- Associate Tags to IPs
- Verify the successful association of tags to IPs
- Disassociate Tags from IPs
We hope you enjoyed this guide. Please provide feedback and suggestions in order for us to improve the content.