Configuration Tasks
With this playbook, you will create items in a PAN-OS next-generation firewall, in order to perform configuration of PAN-OS "as-code". This is one of the most common use case for Ansible in relation to PAN-OS.
Assumptions
This tutorial/guide assumes:
- you have a working installation of Ansible with the PAN-OS collection installed (see example instructions here)
- you have working connectivity to the firewall and/or Panorama
- you have administrative credentials capable of performing the relevant operations on the firewall and/or Panorama
Important - Work in a Lab Environment First
With all of the tutorials and guides presented on this website, please ensure that you attempt the tasks in a lab or a similar safe and non-production environment first. In public cloud scenarios, this should be a non-production cloud account which contains no production assets or data. Confirm the tasks behave as expected and perform the operations you require, before using them in production or other live environments.
Zones, interfaces and routes
In this tutorial, you will create a number of items related to networking. This will include a virtual router, security zones, networking interfaces, and static routes. Then you will commit the configuration to make the changes live.
Create a virtual router and some security zones
- Create a file called
create-vr-and-zones.ymland paste in the following content:
---
- name: Create VR and Zones
  hosts: "firewall"
  connection: local

  vars:
    device:
      ip_address: "{{ ip_address }}"
      username: "{{ username }}"
      password: "{{ password }}"

  collections:
    - paloaltonetworks.panos

  tasks:
    - name: Create new Virtual Router
      paloaltonetworks.panos.panos_virtual_router:
        provider: "{{ device }}"
        name: "new-vrouter"

    - name: Create zone for Internet
      paloaltonetworks.panos.panos_zone:
        provider: "{{ device }}"
        zone: "internet"
        mode: "layer3"
        enable_userid: false

    - name: Create zone for DMZ
      paloaltonetworks.panos.panos_zone:
        provider: "{{ device }}"
        zone: "dmz"
        mode: "layer3"
        enable_userid: false

    - name: Create zone for Users
      paloaltonetworks.panos.panos_zone:
        provider: "{{ device }}"
        zone: "users"
        mode: "layer3"
        enable_userid: true
- Execute the playbook with the following command:
ansible-playbook -i inventory.txt --ask-vault-pass create-vr-and-zones.yml
- The output should be something similar to this:
PLAY [Create VR and Zones] *******************************************************************************************************************************

TASK [Gathering Facts] ***********************************************************************************************************************************
ok: [firewall]

TASK [Create new Virtual Router] *************************************************************************************************************************
changed: [firewall]

TASK [Create zone for Internet] **************************************************************************************************************************
changed: [firewall]

TASK [Create zone for DMZ] *******************************************************************************************************************************
changed: [firewall]

TASK [Create zone for Users] *****************************************************************************************************************************
changed: [firewall]

PLAY RECAP ***********************************************************************************************************************************************
firewall                   : ok=5    changed=4    unreachable=0    failed=0    skipped=0    rescued=0    ignored=0
- Login to the PAN-OS GUI and confirm that the virtual router
new-vrouterhas been created, and the three new zonesinternetdmzandusershave been created.


Configure networking interfaces and create static routes
- Create a file called
create-interfaces-and-routes.ymland paste in the following content:
---
- name: Configure networking
  hosts: "firewall"
  connection: local

  vars:
    device:
      ip_address: "{{ ip_address }}"
      username: "{{ username }}"
      password: "{{ password }}"

  collections:
    - paloaltonetworks.panos

  tasks:
    - name: Configure Internet-facing interface
      paloaltonetworks.panos.panos_interface:
        provider: "{{ device }}"
        if_name: "ethernet1/1"
        vr_name: "new-vrouter"
        mode: "layer3"
        ip: ["1.2.3.5/24"]
        enable_dhcp: false
        zone_name: "internet"

    - name: Configure DMZ-facing interface
      paloaltonetworks.panos.panos_interface:
        provider: "{{ device }}"
        if_name: "ethernet1/2"
        vr_name: "new-vrouter"
        mode: "layer3"
        ip: ["172.16.18.1/24"]
        enable_dhcp: false
        zone_name: "dmz"

    - name: Configure user-facing interface
      paloaltonetworks.panos.panos_interface:
        provider: "{{ device }}"
        if_name: "ethernet1/3"
        vr_name: "new-vrouter"
        mode: "layer3"
        ip: ["192.168.1.1/24"]
        enable_dhcp: false
        zone_name: "users"

    - name: Create default route
      paloaltonetworks.panos.panos_static_route:
        provider: "{{ device }}"
        name: "Default route"
        virtual_router: "new-vrouter"
        destination: "0.0.0.0/0"
        interface: "ethernet1/1"
        nexthop: "1.2.3.1"

    - name: Create route for internal subnet
      paloaltonetworks.panos.panos_static_route:
        provider: "{{ device }}"
        name: "Internal subnet"
        virtual_router: "new-vrouter"
        destination: "192.168.10.0/24"
        interface: "ethernet1/3"
        nexthop: "192.168.1.254"
- Execute the playbook with the following command:
ansible-playbook -i inventory.txt --ask-vault-pass create-interfaces-and-routes.yml
- The output should be something similar to this:
PLAY [Configure interfaces and create static routes] *****************************************************************************************************

TASK [Gathering Facts] ***********************************************************************************************************************************
ok: [firewall]

TASK [Configure Internet-facing interface] ***************************************************************************************************************
changed: [firewall]

TASK [Configure DMZ-facing interface] ********************************************************************************************************************
changed: [firewall]

TASK [Configure user-facing interface] *******************************************************************************************************************
changed: [firewall]

TASK [Create default route] ******************************************************************************************************************************
changed: [firewall]

TASK [Create route for internal subnet] ******************************************************************************************************************
changed: [firewall]

PLAY RECAP ***********************************************************************************************************************************************
firewall                   : ok=6    changed=5    unreachable=0    failed=0    skipped=0    rescued=0    ignored=0
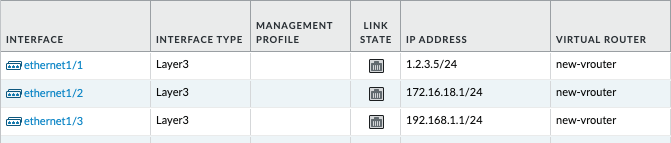
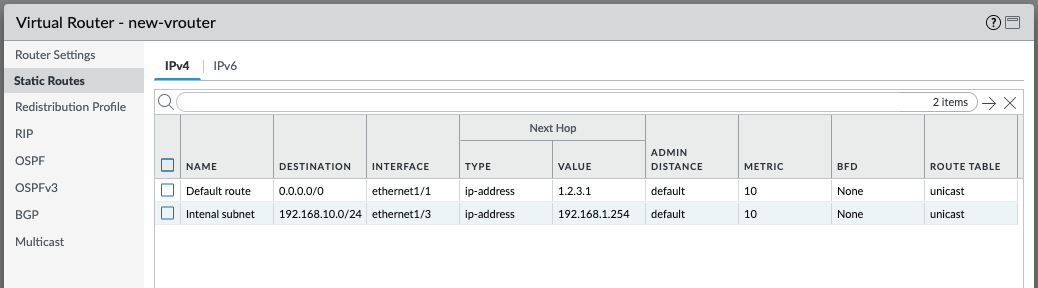
- Login to the PAN-OS GUI and confirm that
new-vrouternow has three network interfaces, and that two static routes have been created.

Commit the configuration
- Create a file called
commit-firewall.ymland paste in the following content:
---
- name: Commit firewall candidate configuration
  hosts: "firewall"
  connection: local

  vars:
    device:
      ip_address: "{{ ip_address }}"
      username: "{{ username }}"
      password: "{{ password }}"

  collections:
    - paloaltonetworks.panos

  tasks:
    - name: Commit candidate configuration
      paloaltonetworks.panos.panos_commit_firewall:
        provider: "{{ device }}"
      register: results
    - debug:
        msg: "Commit with Job ID: {{ results.jobid }} had output: {{ results.details }}"
- Execute the playbook with the following command:
ansible-playbook -i inventory.txt --ask-vault-pass commit-firewall.yml
- The output should be something similar to this:
PLAY [Commit firewall candidate configuration] *************************************************************************************************************************************

TASK [Gathering Facts] *************************************************************************************************************************************************************
ok: [firewall]

TASK [Commit candidate configuration] **********************************************************************************************************************************************
changed: [firewall]

TASK [debug] ***********************************************************************************************************************************************************************
ok: [firewall] => {
    "msg": "Commit with Job ID: 5410 had output: ['Configuration committed successfully']"
}

PLAY RECAP *************************************************************************************************************************************************************************
firewall                   : ok=3    changed=1    unreachable=0    failed=0    skipped=0    rescued=0    ignored=0
Closing notes
- Tasks do not have to be divided into playbook files as has been described in this tutorial. All the tasks could have been placed in a single playbook, or equally the tasks could have been divided into more playbooks than those used in the tutorial. The structure of your playbooks is something to consider as you operationalize Ansible within your organization.
- If you used the setup instructions listed here, you were using a static inventory file, and local PAN-OS credentials encrypted on disk with
ansible-vault. This is very suitable for a learning tutorial, but these approaches may not be suitable for production, and are also something to consider as you operationalize Ansible within your organization. - Almost all values for tasks were defined within the playbooks; names of configuration items, IP addresses, and more. This is very suitable for a learning tutorial, but this approach does not scale well in production, and using variables instead is something to consider as you operationalize Ansible within your organization.